
SolisCloud Quick Commission Guide
(including pair an existing inverter with Residential SolisStorage batteries)
Applies to: SolisCloud Mobile App – Quick Commission feature (Android/iOS), Solis data loggers, Solis inverters
Last updated: July 13, 2026
Introduction
Quick Commission is a brand-new SolisCloud feature designed to simplify and accelerate the commissioning process. It provides clear, step-by-step guidance that walks installers through the entire setup process—from logger networking and device configuration to plant creation—in just a few minutes.
Whether you are commissioning a new system or upgrading an existing installation, Quick Commission helps ensure a smooth setup experience and allows you to quickly begin monitoring your PV system.
If you plan to pair an existing inverter with SolisStorage batteries (IntelliHome, IntelliHouse, FlexHome-L, FlexHome-H) the inverter firmware may need to be upgraded to enable all battery functions, including detailed battery monitoring and OTA (Over-The-Air) firmware updates. You can check the markings on the battery outer carton to determine whether a firmware upgrade is required.
Important: A firmware upgrade typically takes approximately 40–50 minutes to complete.
? PRO TIP – Save Installation Time
To optimize installation efficiency and reduce total time spent on site, we recommend the following workflow:
Recommended Installation Sequence
- Install the inverter and complete all grid connection wiring.
- Use the Quick Commission function to:
- Configure the network connection.
- Start the inverter firmware upgrade.
Why This Helps
The firmware upgrade process is fully automatic and does not require continuous on-site supervision. While the upgrade is running, you can continue with other installation activities, such as:
- Installing the SolisStorage battery.(IntelliHome, IntelliHouse, FlexHome-L, FlexHome-H)
- Routing and securing cables.
- Installing conduit and trunking.
- Completing final mechanical installation work.
By performing these tasks in parallel with the firmware upgrade, you can significantly reduce the overall installation time and improve efficiency on site.
Quick Commissioning Video (Recommended)
✅ Fast Commissioning Guide – Only 1 Minute
Before starting the commissioning process, you can watch our 1-minute Quick Commissioning Video for a fast overview of the setup procedure.
? YouTube Video (1 Minute):
Click here for the Quick Commissioning YouTube Video
Note: This video takes only 1 minute to watch and provides a quick walkthrough of the commissioning process.
Announcements
Supported Data Loggers
Please ensure that the data logger connected to the inverter is one of the following models:
- S5-WiFi-ST
- S2-WL-ST
- S1-W4G-ST
Important Notes
Do not disconnect the Bluetooth connection between your mobile phone and the device during the upgrade process.
Do not move your phone outside the Bluetooth communication range.
Do not disconnect power from the inverter during the upgrade.
Keep the SolisCloud App running in the foreground throughout the process.
Ensure your mobile device has sufficient battery charge.
Verify that your SolisCloud App version is V5.2.221 or later.
Navigate to: Me → Try the New Version
SolisCloud App Update
If your app version is outdated, scan the official QR code or search for "SolisCloud" in your app store to download the latest version.

Operating Steps
Step 1 – Complete System Wiring
Follow the inverter and battery installation instructions provided in the product packaging to complete all wiring connections.
Step 2 – Power Up the Battery
Refer to the battery manual and:
- Open the battery circuit breaker.
- Press the battery power switch button.
- Wait for the inverter display screen to power on.
Step 3 – Open Quick Commissioning
Enable Bluetooth on your mobile phone.
Open the SolisCloud App.
Navigate to:
Service → Common Tools → Quick Commission
Step 4 – Connect to the Data Logger
- Scan the QR code on the data logger.
- Alternatively, select the Bluetooth signal matching the logger serial number (SN) from the Bluetooth device list.
- Establish the connection.
| Screenshot Step 3 | Screenshot Step 4 |
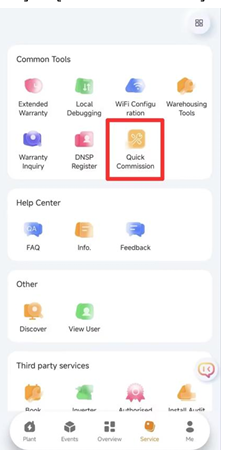 | 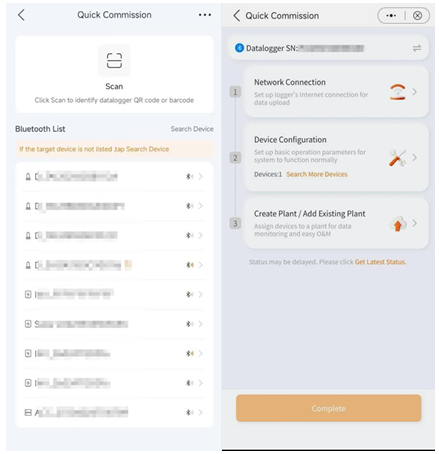 |
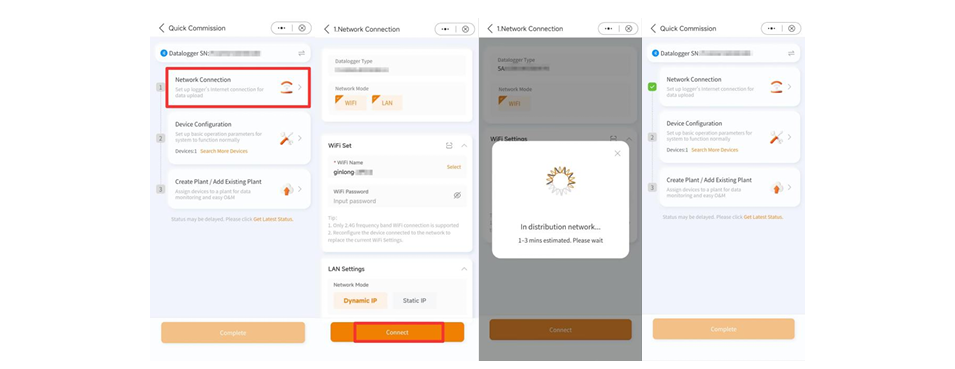
Step 5 – Configure Network Connection
- Select Network Connection.
- The system will automatically identify the data logger type and communication mode.
- Follow the on-screen instructions.
- Configure the required network settings.
- Click Connect.
Note
When configuring Wi-Fi:
- You may scan a Wi-Fi QR code shared by another device.
- Or click Selectto choose a Wi-Fi network.
- Android: Opens a drop-down list.
- iOS: Navigates to system Wi-Fi settings.
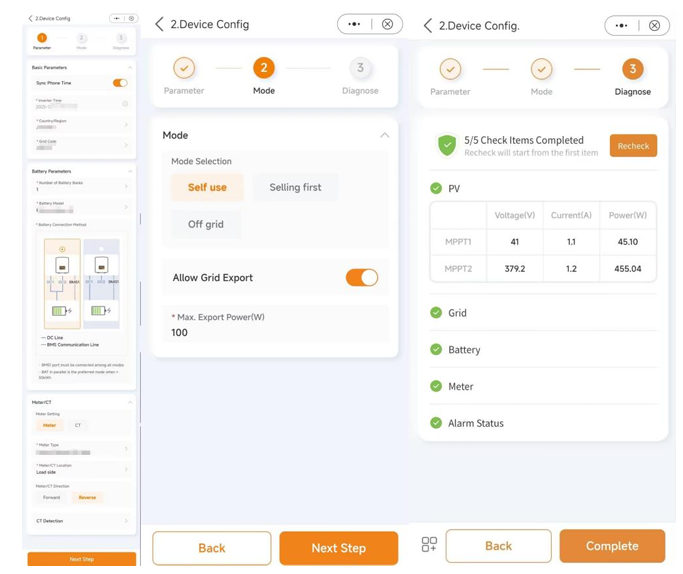
Step 6 – Device Configuration
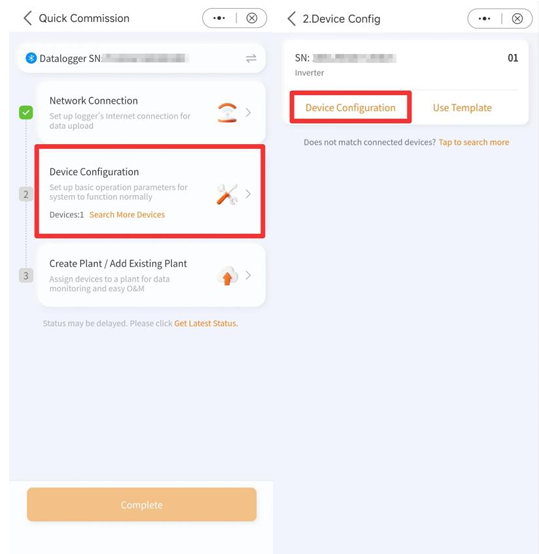
- Click Device Configuration.
- The app will display all inverter devices connected through the data logger.
- Follow the setup instructions shown on screen.
- Complete all required settings.
- Click Next Step.
The system will automatically start the installation diagnosis process.
Important
When using Solisstorage batteries, select:
Battery Model → Solisstorage
Notes
Note 1
The available inverter settings may vary slightly depending on the inverter model.
Please follow the actual interface shown within the app.
Note 2
System diagnosis checks:
- PV Status
- Grid Status
- Battery Status
- Meter Status
- Alarm Status
If abnormal conditions are detected (for example battery communication issues), you may click Complete to skip the abnormal warning and continue.
 |  |
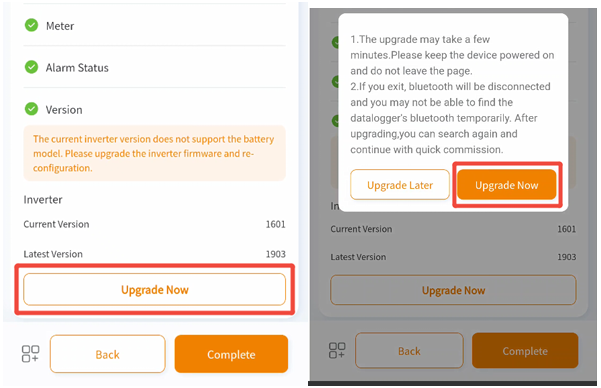
Step 7 – Firmware Upgrade
If the inverter firmware is not the latest version:
- Click Upgrade Now.
- Wait until the firmware upgrade is completed.
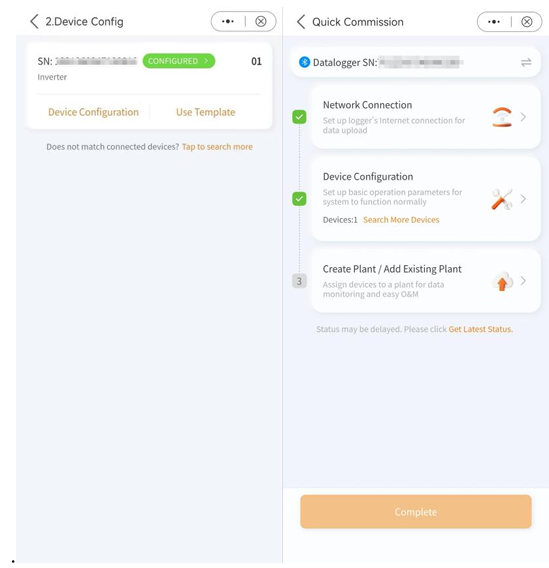
After successful configuration:
- The device status will display CONFIGURED.
- The Device Configuration step will be highlighted.
- Clicking CONFIGURED will open the local device details page.
 |  |
Step 8 – Create Plant or Add Existing Plant
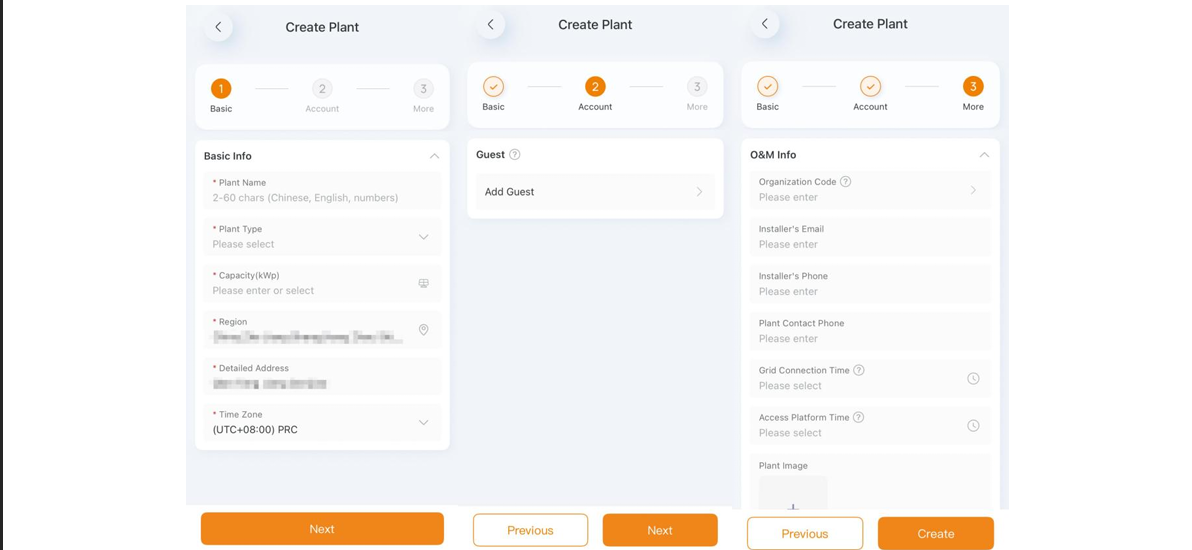
Option A – Create Plant
If you want to register the system under a new plant:
- Click Create Plant.
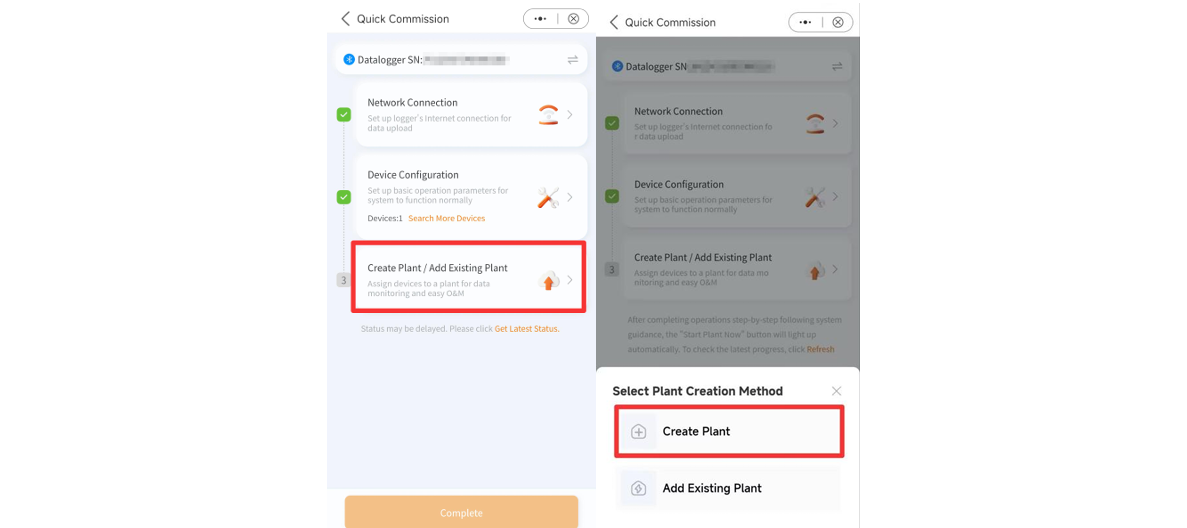
- Enter the required plant information.
- Follow the prompts to complete plant creation.
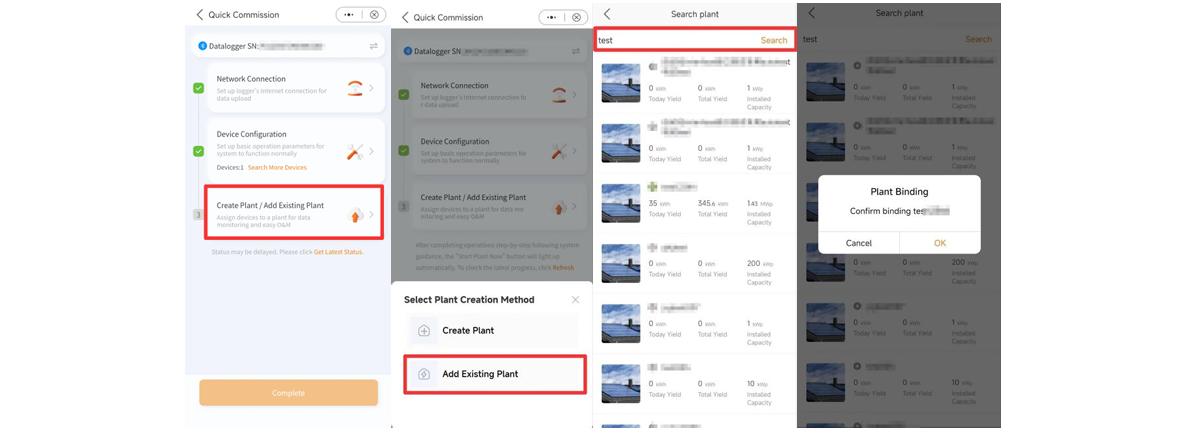
Option B – Add Existing Plant
If you want to add the device to an existing plant:
- Click Add Existing Plant.
- Search and view all plants associated with your account.
- Select the desired plant.
- Click OK.
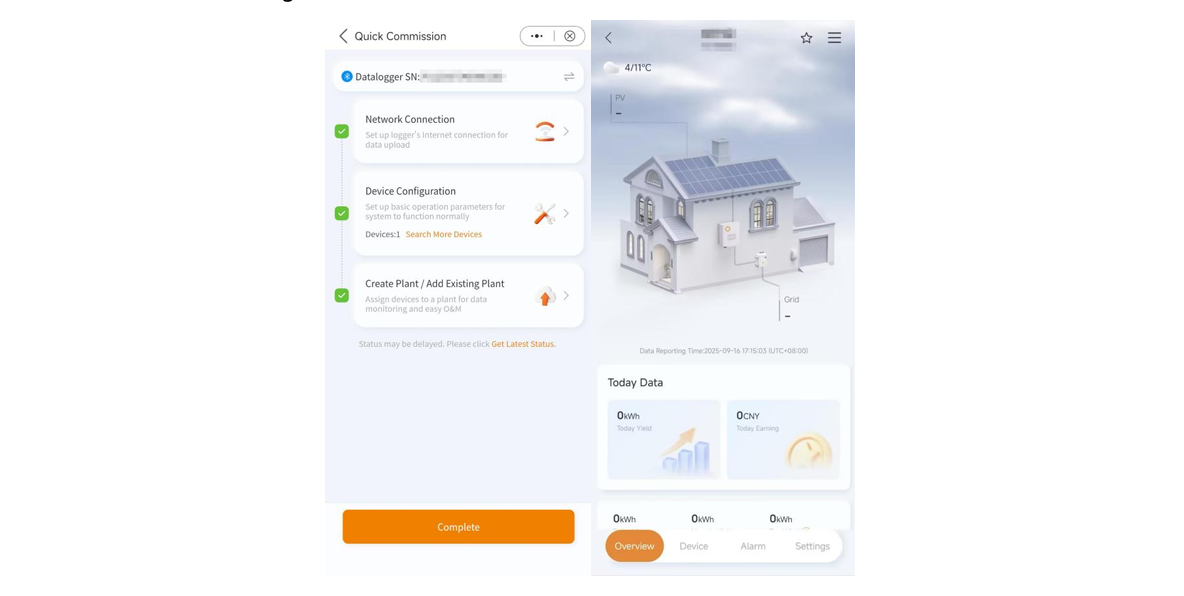
After completing either option:
- The Create Plant/Add Existing Plant step will be highlighted.
- Click Complete.
- The application will enter the plant page and commissioning will be completed.
Commissioning Complete
After all steps have been successfully completed:
✅ Inverter configured
✅ Network connected
✅ Firmware updated (if required)
✅ Plant created or assigned
✅ Solisstorage ESS commissioned successfully
Troubleshooting & Tips
- If the logger is not discovered via Bluetooth: ensure BT is enabled, move within 1–2 m of the logger, and power-cycle the logger.
- If Wi-Fi selection does not show on iOS: use system Settings → Wi-Fi to connect, then return to SolisCloud.
- If diagnosis flags issues: review the item details and apply the suggested solutions before proceeding.
- For parameter options missing on certain inverter models: check device firmware level and model-specific capabilities.
FAQs
- Q: How long does Quick Commission typically take?
A: A few minutes, depending on network setup and device count. - Q: Can I bind multiple inverters under one logger?
A: Yes; all connected devices appear under Device Configuration. - Q: Can I change the plant after commissioning?
A: Yes; devices can be re-bound using Add Existing Plant or reassigned via device details.
Related Documents
- SolisCloud Mobile App User Guide
- Solis Data Logger Installation Manual
- Troubleshooting for WiFi Dataloggers Network Connection
- Troubleshooting S1-W4G-ST datalogger Network Connection Errors