
On-site Operation Guide for Disassembly and Packaging of Faulty Inverters
Applicable Models: All Grid-Tied and Energy Storage Products
1. Purpose
This document provides standardized instructions for the safe disassembly and proper packaging of faulty inverters during after-sales service. Following this guide helps prevent personal injury, secondary equipment damage, and transport-related issues.
2. Disassembly Process
2.1 Disassembly Procedure
Step 1: Power Off and Disconnect
- Shut down the inverter via the front panel or monitoring system.
- Disconnect the power supply in the following order:
- AC side first
- DC side second
Step 2: Remove Terminal Cables
- Remove terminal cables following the same sequence as power disconnection:
- AC cables first, then DC cables.
- Take clear photos of all terminal connections before removal to ensure correct reconnection if needed.
Step 3: Remove the Back Mounting Plate
- Use an electric screwdriver or torque screwdriver to loosen and remove the screws from the back mounting plate.
Step 4: Place the Unit on the Ground
- Carefully remove the inverter from its mounting position.
- Place the unit flat and slowly on a stable, level surface.
2.2 Disassembly Safety Notes
- Always follow the sequence: Power off → Disconnect power → Verify no voltage.
- Live disassembly is strictly prohibited.
- Never disconnect DC power before AC power.
- Handle the inverter gently throughout the process.
- Avoid any impact or contact with the terminal surface.
- Do not use force during disassembly.
- All faulty inverters must be returned using the original packaging or equivalent protective packaging approved by after-sales support.
3. Packaging Process
3.1 Packaging Procedure
Step 1: Prepare the Carton
- Use the original inverter packaging whenever possible or the one of the replacement inverter.
- If unavailable, use a carton confirmed by after-sales support to provide equivalent protection.
- Place the carton on a flat, stable surface.
Step 2: Add Bottom Padding
- Place a layer of protective padding at the bottom of the carton.
- Acceptable materials include foam inserts, EPS/EPP foam, molded or non-molded foam, or air cushion bags.
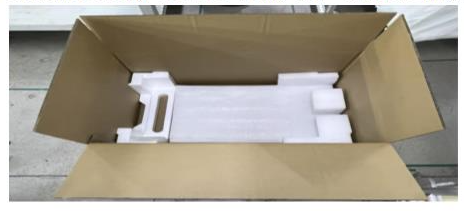
Step 3: Place the Faulty Inverter
- Carefully place the inverter flat and centered inside the carton.
Step 4: Add Top and Side Padding
- Add padding around all sides and on top of the inverter.
- Ensure the padding height is level with the top edge of the carton.
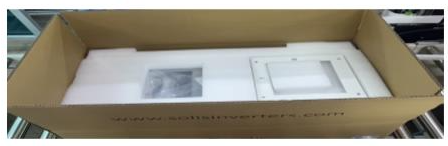
Step 5: Seal the Carton
- Seal the carton using packing tape.
- Apply tape in an “H” sealing pattern to ensure carton integrity.

3.2 Packaging Notes
- The carton must be free from visible damage or deformation.
- Top and bottom padding thickness should be similar to ensure full protection.
- Handle the inverter gently during packaging to prevent secondary impact or damage.
4. Important Reminder
Improper disassembly or packaging may result in transport damage and can affect warranty or service processing. Always follow this guide and after-sales instructions when returning faulty inverters.
Ginlong Technologies Co., Ltd.
This document is intended for customer and partner use during after-sales service operations.

Connect with Solis