
SolisCloud Quick Commission Guide
Applies to: SolisCloud Mobile App – Quick Commission feature (Android/iOS), Solis data loggers, Solis inverters
Last updated: July 13, 2026
Purpose
Click the commissioning video know and safe it in your favourites
Benefits of Quick Commission
Quick Commission helps installers:
- Reduce commissioning time.
- Eliminate navigation between multiple menus.
- Configure inverter and storage settings in a single workflow.
- Perform diagnostics before system handover.
- Create or assign plants during commissioning.
- Improve first-time installation success rates.
Prerequisites
- SolisCloud app installed and logged in with an account that has access to target plants.
- Physical access to the logger and connected inverters.
- Wi-Fi SSID/password (or Wi-Fi QR code), or alternative network mode credentials.
- Bluetooth enabled on the mobile device.
Guided Commissioning Workflow
Quick Commission uses a structured three-stage process:
- Network Connection
- Device Configuration
- Plant Creation or Existing Plant Assignment
Each stage must be completed before proceeding to the next step, ensuring that all required commissioning tasks are performed in the correct order. Completed sections are automatically highlighted within the interface.
Accessing Quick Commission
In SolisCloud: go to Service → Common Tools → Quick Commission. Scan the logger QR code or select the logger from the Bluetooth list to enter the Quick Commission page.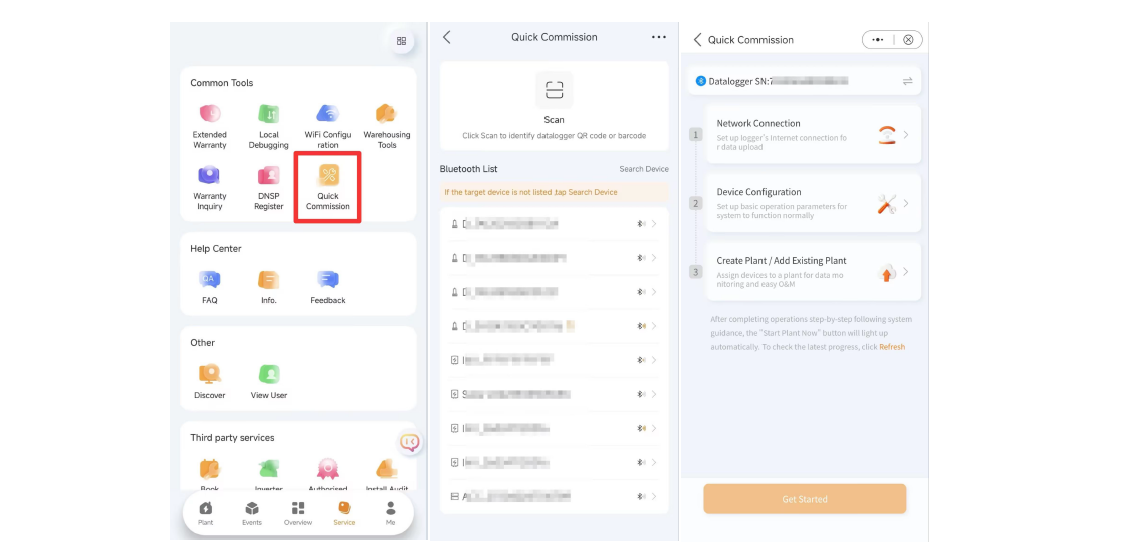
Step 1 — Network Connection
Tap **Network Connection**. The system automatically identifies the logger type and mode and prompts for the appropriate settings. Configure per prompts, then tap **Connect** to complete the connection. The **Network Connection** step will be highlighted upon success.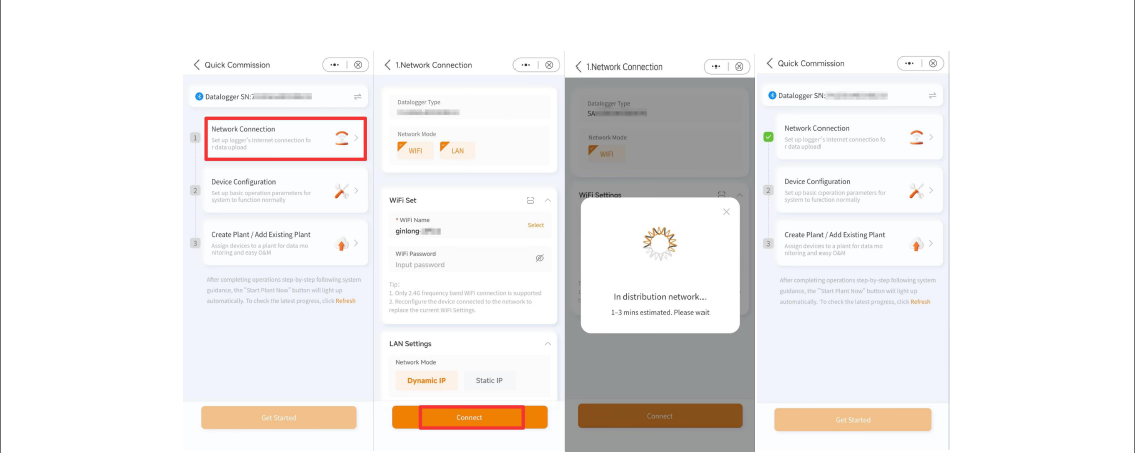
Note: When setting up Wi-Fi, you can scan a shared Wi-Fi QR code or tap **Select** to choose a network (Android shows a drop-down list; iOS redirects to system settings).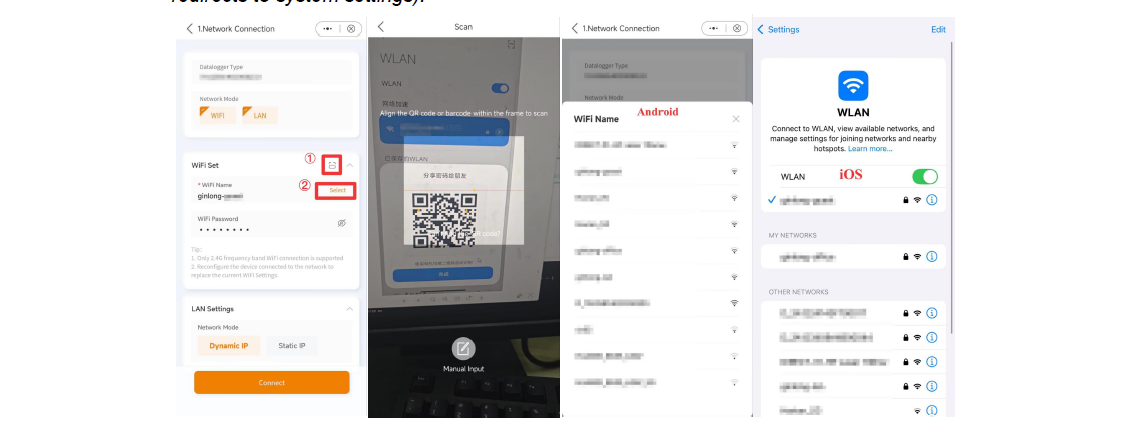
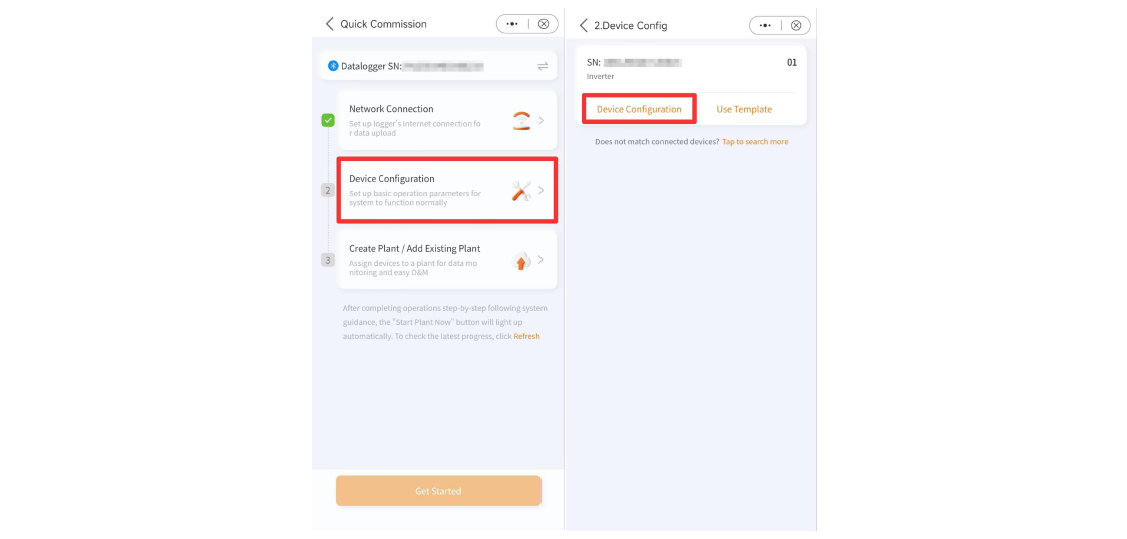
Step 2 — Device Configuration
Selecting Device Configuration displays all inverter devices connected to the logger.
The commissioning process consists of three configuration stages:
Set Parameters
Configure inverter-specific settings required for system operation. Available parameters may vary depending on inverter model and firmware version.
Set Energy Storage Mode
For hybrid and battery systems, installers can configure the energy storage operating mode directly during commissioning. This removes the need to navigate through separate configuration menus after installation.
ce.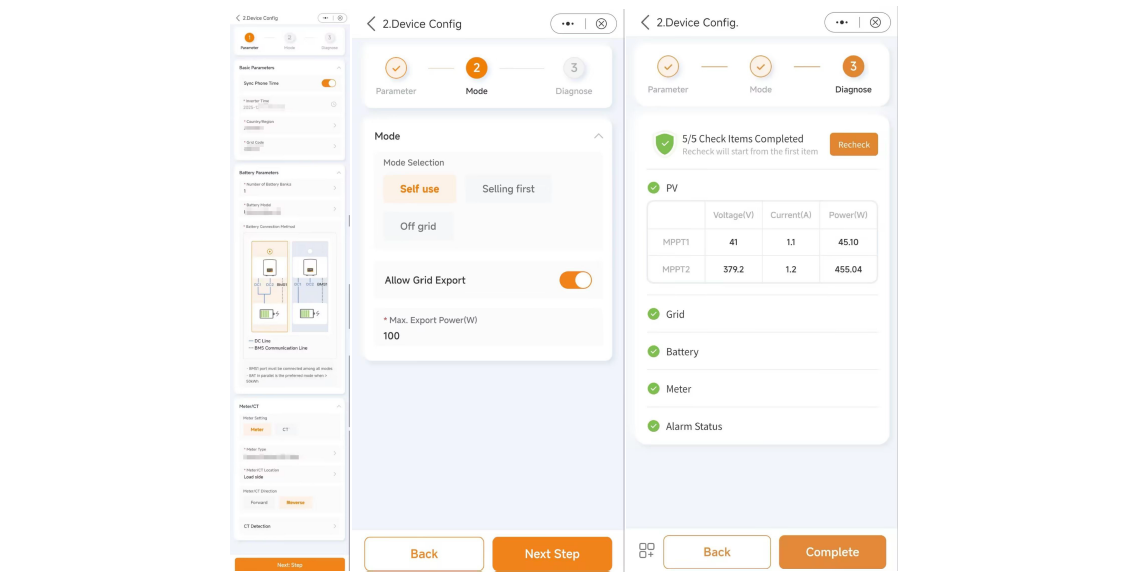
Diagnostics
Run a system diagnostic before handover to verify proper operation of all connected equipment.
The integrated diagnostic tool checks the following components:
- PV Status
- Grid Status
- Battery Status
- Meter Status
- Alarm Status
Any detected issue can be selected to view additional information and troubleshooting guidance.
This allows installers to identify configuration and communication issues before leaving the installation site.

Configuration Status Indicators
After successful commissioning:
- Devices are marked as Configured.
- Completed workflow stages are highlighted.
- Installers can access local device details directly from the commissioning screen for verification purposes.
After configuration, devices are marked **CONFIGURED**, and the Device Configuration step is highlighted. Tapping **CONFIGURED** opens the local device details page.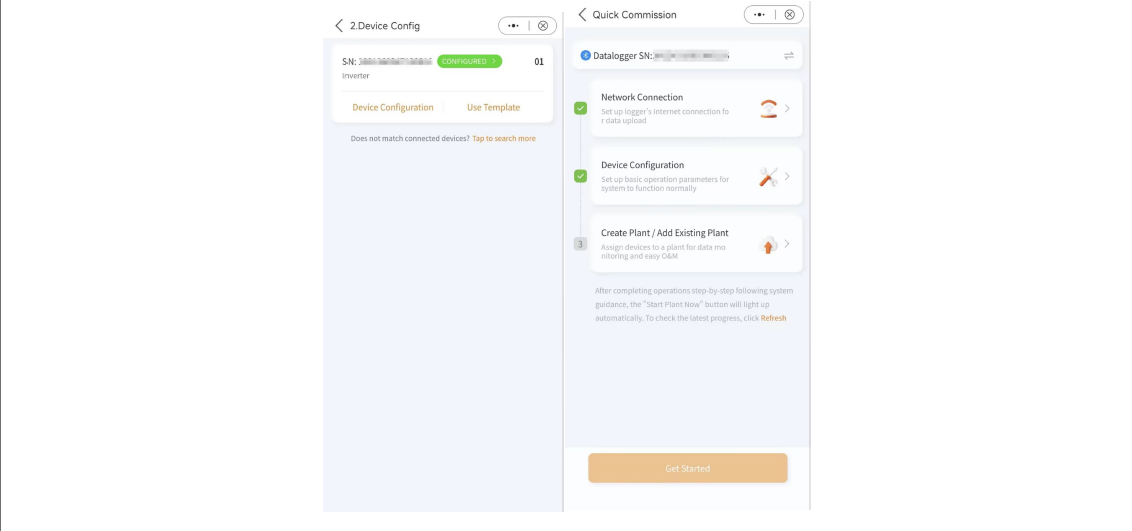
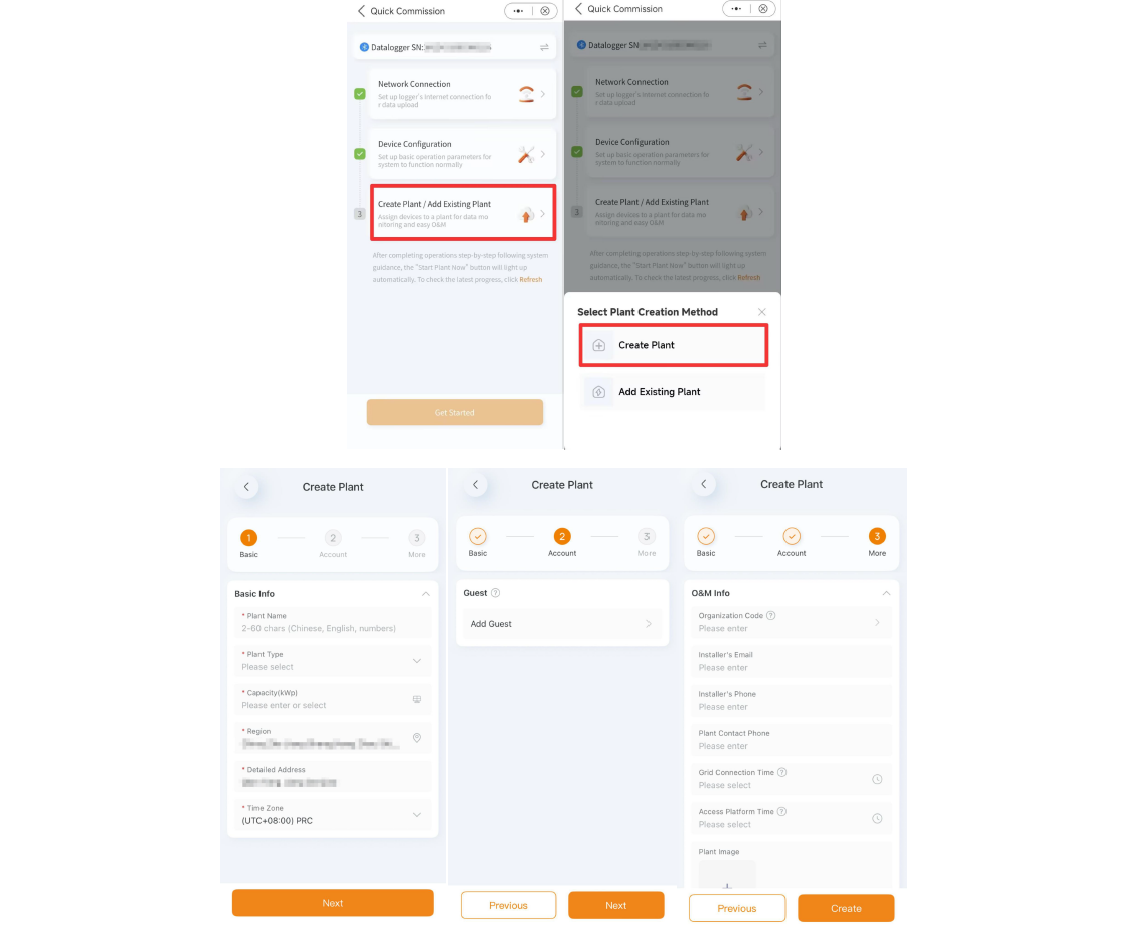
Step 3 — Create Plant or Add Existing Plant
After device configuration is completed, Quick Commission allows installers to either:
Create a New Plant
Create a new monitoring site directly from the commissioning workflow by entering the required plant information
Add to an Existing Plant
Search and select any existing plant associated with the installer's account and assign the newly commissioned equipment to that plant.
After completion, select Get Started to enter the plant monitoring page.
If binding to an existing plant, tap **Add Existing Plant**, search plants under your account, select the target plant, and tap **OK**.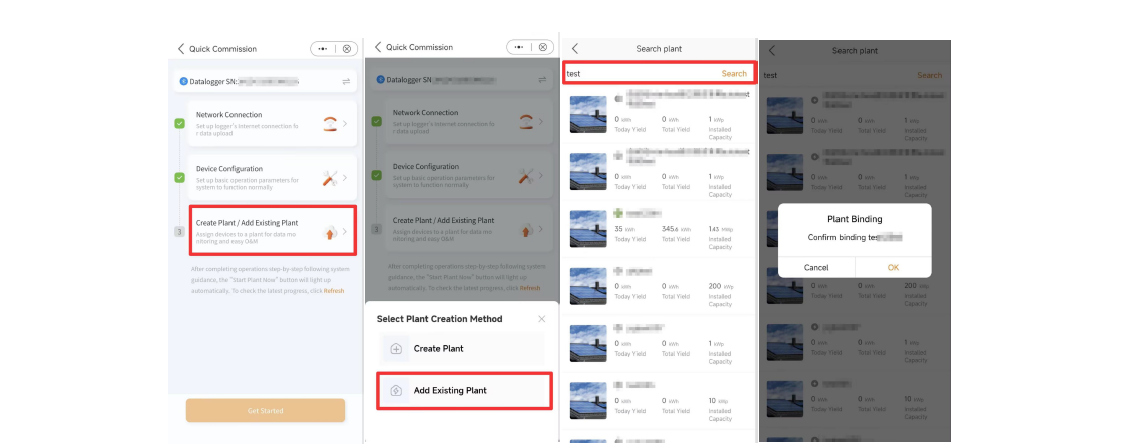
When finished, the step is highlighted. Tap **Get Started** to enter the plant page and complete commissioning.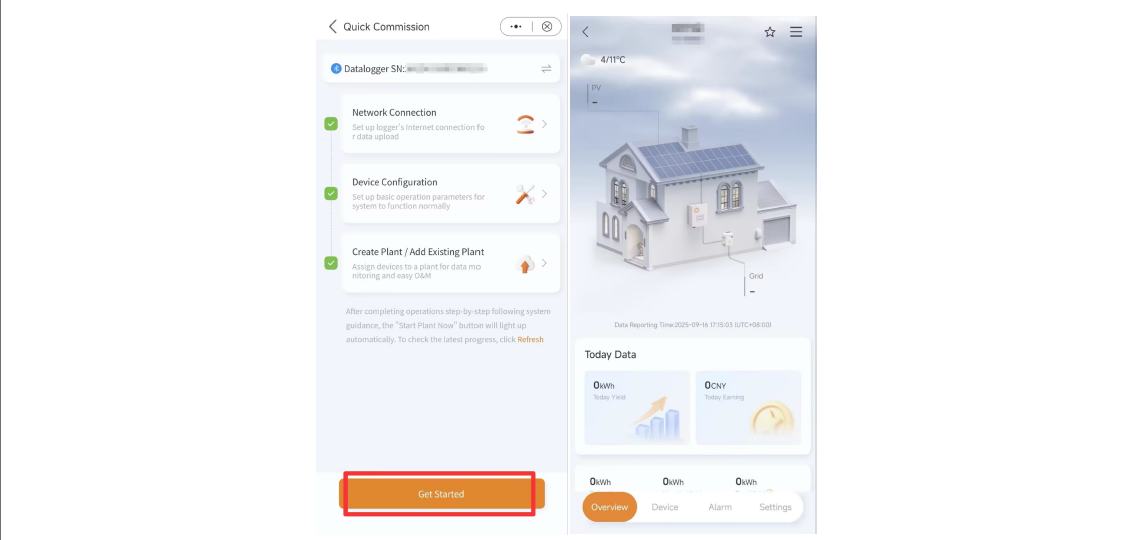
Troubleshooting & Tips
- If the logger is not discovered via Bluetooth: ensure BT is enabled, move within 1–2 m of the logger, and power-cycle the logger.
- If Wi-Fi selection does not show on iOS: use system Settings → Wi-Fi to connect, then return to SolisCloud.
- If diagnosis flags issues: review the item details and apply the suggested solutions before proceeding.
- For parameter options missing on certain inverter models: check device firmware level and model-specific capabilities.
FAQs
- Q: How long does Quick Commission typically take?
A: A few minutes, depending on network setup and device count. - Q: Can I bind multiple inverters under one logger?
A: Yes; all connected devices appear under Device Configuration. - Q: Can I change the plant after commissioning?
A: Yes; devices can be re-bound using Add Existing Plant or reassigned via device details.
Related Documents
- SolisCloud Mobile App User Guide
- Solis Data Logger Installation Manual
- Troubleshooting for WiFi Dataloggers Network Connection
- Troubleshooting S1-W4G-ST datalogger Network Connection Errors

![]()
![]()
![]()
![]()
![]()